Thursday, May 19, 2016

Retrieving data from SQL Server using RecordSet object in VBScript

Option Explicit

Dim Conn ' Connection Variable
Dim rs ' Recordset Variable
Dim sqlQuery
Dim serverName
Dim field


'Declare the SQL statement that will query the database
sqlQuery = "SELECT UserName FROM dbo.UserList WHERE ID = '9'"


'Create an instance of the ADO connection and recordset objects

Set Conn = CreateObject("ADODB.Connection")
Set rs = CreateObject("ADODB.Recordset")


'Open the connection to the database
Conn.Open "DSN=getUser;UID=user1;PWD=password;Database=dbUserList"


'Open the recordset object executing the SQL statement and return records 
rs.Open sqlQuery,Conn


'Check if any record exist in table 
If rs.EOF Then 
wscript.echo "No Record Found"
wscript.quite
Else 

Do While NOT rs.Eof   
field = rs("UserName")
if field <> "" then
  wscript.echo field
end if
rs.MoveNext     
Loop

End If


'Close Connection and Recordset
rs.Close
Set rs=nothing
Conn.Close
Set Conn=nothing

VBScript Prompt a User for Input


It was been ask by one of my friend that how to get input from user in VBScript. I though by adding this to blog, that will help other.

getStringValue = InputBox("Please enter some value :","Window Title")

You can also use this in condition also in this.

If getStringValue="" then

 Wscript.Quite

else

  Wscript.Echo getStringValue

End if

Wednesday, May 18, 2016

VBScript to update Access Database


Save following line to .VBS file


Const adOpenStatic = 3
Const adLockOptimistic = 3

Set objConnection = CreateObject("ADODB.Connection")
Set objRecordSet = CreateObject("ADODB.Recordset")

objConnection.Open _
    "Provider = Microsoft.Jet.OLEDB.4.0;; Data Source = C:\Temp\Local.mdb"

objRecordSet.Open "Update Set = ", _
        objConnection, adOpenStatic, adLockOptimistic

OR

objRecordSet.Open "Insert into Values(,,...)", _
        objConnection, adOpenStatic, adLockOptimistic


Execute script Via Command Line

  1. Hold your windows key and press “R” to open the command prompt
  2. type: “%windir%\SysWoW64\wscript.exe
  3. Press OK

Thursday, May 12, 2016

Twisty or Collapse or expand parts of a document

When you’re working on a long, complicated document, you can collapse everything except the part you want to focus on. Or, if you think you might be overloading your readers with too much information, you can display summaries and leave it to your readers to open the summary and read the details if they want.

The ability to collapse and expand content in your document is based on its outline level. You can quickly add an outline level and make part of your document collapsible by adding a heading using Word's built-in styles.


After applying the heading style, you’ll see a small triangle when you move your cursor over the heading. Click the triangle to collapse the body text and subheadings below it.


TIP:  If you’re working on a touch device, tap to place your cursor in the heading to see the triangle.
Click the triangle again to expand that part of the document.
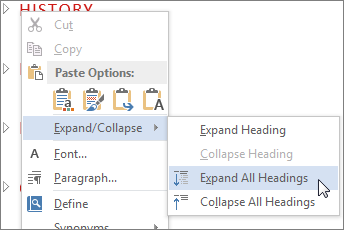
To collapse or expand all the headings in your document, right-click the heading and click Expand/Collapse > Expand All Headings or Collapse All Headings.


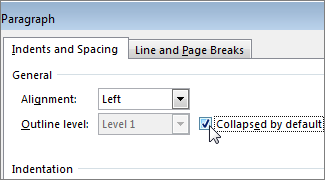
When you close and reopen a document, the headings will be expanded by default. If you want the document to open with the headings collapsed, follow these steps.

1) Place your cursor in the heading.
2) On the Home tab, click the arrow in the Paragraph group.


3) In the Paragraph dialog box, click the checkbox next to Collapsed by default.


4) Click OK.

Contents are reference from Site

Tuesday, May 3, 2016

The Best Excel Shortcuts You Need to Know

Almost everyone uses Excel in some form or fashion in the modern workforce, but many of us may be wasting a little too much time trying to format those pesky spreadsheets. In order to help you work a little bit faster, or maybe more efficiently. Find below best Excel shortcuts that you need to know!

  • F2 : Edit selected cell
  • F9 : Calculates all worksheets
  • F11 : New chart
  • ALT : Access the ribbon for formulas
  • ALT + = : Automatically SUM() selected
  • ALT + Enter : Start a new line in the same cell
  • ALT + o-c-a : Auto size columns
  • PG + UP/PG+DOWN : Go to next/previous worksheet
  • CTRL + ` : Display Formulas
  • CTRL + Backspace : Show active cell
  • CTRL + Shift + # : Change Date format with day, month and year.
  • CTRL + K : To insert Hyperlink.
  • CTRL+ Shift + $ : Applies the currency format to the selected cells.
  • CTRL + Shift + & : Applies border to cells
  • CTRL + B : Bold
  • CTRL + I : Italics
  • CTRL + U : Underline
  • CTRL + Shift + ~ : General style number
  • CTRL + Shift + $ : Currency style number
  • CTRL + Shift + % : Percentage style Number
  • CTRL + Shift + ^  : Scientific notation style
  • CTRL + Shift + # :  Date style
  • CTRL + Shift + @ : Time Style
  • CTRL + Shift +! : Number Style
  • CTRL + F12 : Open
  • CTRL + Spacebar : Select the entire column
  • CTRL + [ : Select all cells directly referenced by formulas in the selection
  • CTRL + A : Select All
  • CTRL + Shift + J : List Constants
  • CTRL + D : Copy equation down
  • CTRL + F : Find
  • CTRL + H : Find&Replace
  • CTRL + Right arrow : Move right
  • CTRL + Left arrow : Move left
  • CTRL + Up arrow : Move up
  • CTRL + Down arrow : Move down
  • CTRL + Enter : Same data in multiple cells
  • Shift + Spacebar : Select the entire row
  • Shift + F3 : Find Previous

Monday, May 2, 2016

Visual Studio Keyboard Shortcuts


To format document in visual studio
Ctrl + K, D

To comment selected code
Ctrl + K, C

To uncomment selected code
Ctrl + K, U

Show intellisense
Ctrl + Space

Covert selected text to UPPERCASE
Ctrl + Shift + U

Covert selected text to LOWERCASE
Ctrl + U

Toggle Full Screen
Alt + Shift + Enter

Build Project
Shift + F6

Build Solution
Ctrl + Shift + B OR F6

Attach the debugger to a process
Ctrl + Alt + P

Expand or Collapse current element
Ctrl + M, M

Collapse all
Ctrl + M, O

Toggle all Outlining
Ctrl + M, L 

Thursday, April 28, 2016

Get FileName list form a Folder in EXCEL

The code below retrieves the file in this directory and creates a list of their names and paths:

Sub GetFileNameList()

Dim objFSO As Object
Dim objFolder As Object
Dim objFile As Object
Dim i As Integer

'Create an instance of the FileSystemObject
Set objFSO = CreateObject("Scripting.FileSystemObject")

'Get the folder object
Set objFolder = objFSO.GetFolder("C:\TMP")

i = 1
'loops through each file in the directory and prints their names and path

For Each objFile In objFolder.Files

    'print file name
    Cells(i + 1, 1) = objFile.Name

    'print file path
    Cells(i + 1, 2) = objFile.path
    i = i + 1

Next objFile

End Sub