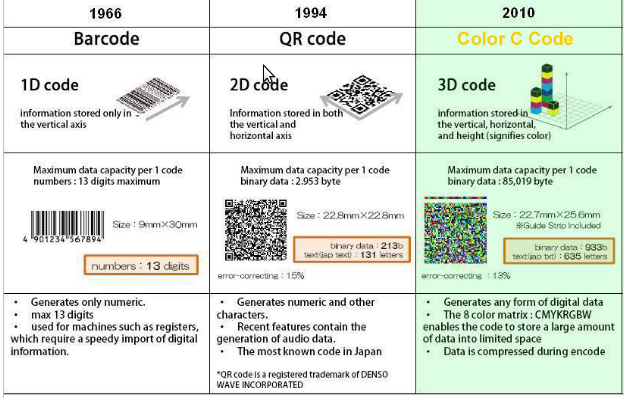
Friday, January 23, 2015

Essential keyboard shortcuts for MS-EXCEL


Keyboard shortcuts are the best way to navigate cells or enter formulas more quickly.

Control-Down/Up Arrow = Moves to the top or bottom cell of the current column Control-Left/Right Arrow = Moves to the cell furthest left or right in the current row

Control-Shift-Down/Up Arrow = Selects all the cells above or below the current cell

Shift-F11 = Creates a new blank worksheet within your workbook

F2 = opens the cell for editing in the formula bar

Control-Home = Navigates to cell A1

Control-End = Navigates to the last cell that contains data

Alt-= = Autosums the cells above the current cell

Wednesday, January 21, 2015

Difference Between 1D, 2D & 3D Barcode

1D Barcodes
One dimensional barcodes, also called 1D barcodes or linear barcodes are the original.The parallel black lines on the white background is the barcode used since the 1970's solely for storing product numbers and serial numbers for purposes of tracking and pricing various products.


2D Barcodes
This barcodes are called "matrix" or "two dimensional" barcodes, and they are a worthy upgrade to the old one dimensional barcode. 2D barcodes boast a higher storage space and the ability to store more than just a handful of numbers. Instead, the latest versions can store thousands of alphanumeric characters and some can even store characters from other languages! Even more impressive is how many 2D barcodes can perform other functions like launching applications on smart phones, a popular feature of QR Codes, Microsoft Tags and JagTags. The technology behind these 2D barcodes has been around for over 10 years, but popularity has just began to surge in recent years.


3D Barcodes
With two dimensional barcodes being so new, why would there be a replacement already? Three dimensional, or "3D", barcodes are more of an upgrade than an out right replacement. These barcodes are very similar to two dimensional barcodes in function. They can be scanned with simple devices like smart phones and even look the same as far as data encoding. The difference comes in durability. 2D barcodes have a built-in error correction that compensates for some smudging and distortion, but this still isn't feasible when it comes to high temperature or chemical environments. Many manufacturers have cried out for barcodes which can stand up to the temperatures and materials that they use everyday to create their products. 3D barcodes are just that. Instead of reading data based on the ratio of black to white in the barcode, they are read based on height. The 3D barcode is embossed on the product and the scanner looks at the height of each module in the barcode comparatively to decode the information inside.


Monday, September 1, 2014

SharePoint 2013 - Top 10 benefits

  1. A new and simplified user experience.  Drag and drop content into document libraries, see live previews of your content, edit lists inline and create sites in a few simple clicks. SharePoint 2013 puts you in control.
  2. A new way to work together. New social features let you share what you’re working on, ask questions and keep track of what your colleagues are doing. SharePoint 2013 puts social to work.
  3. Grow your network. New search profile features help you connect with people across your organization and easily discover interests, past projects and documents they've worked on. SharePoint 2013 helps you find answers to questions and discover experts you never knew existed.
  4. Store and sync your documents. Sky Drive Pro sync’s your content in SharePoint to your desktop, so if you’re working remotely or about to jump on a plane your docs are just a mouse click away. SharePoint 2013 keeps your content in sync from virtually anywhere.
  5. Share your stuff.  A new simple way to share documents from Office or Sky Drive Pro with people inside and outside of your organization puts working together with anyone just a couple of clicks away. SharePoint 2013 helps you get stuff done.
  6. Keep your teams in sync. Set up a new team site in minutes with wizards built into SharePoint to help you set permissions, track meeting notes and bring together all your team’s email and documents in one place. SharePoint 2013 makes teamwork easy.
  7. Keep your projects on track. SharePoint helps you organize your projects and tasks giving you a view into upcoming deliverable across SharePoint, Outlook and Microsoft Project.  SharePoint 2013 helps you prioritize and get stuff done.
  8. Find what you’re looking for.  SharePoint helps you quickly customize and narrow your search to deliver more relevant results, and also provides recommendations on people and documents to follow. SharePoint 2013 makes it easy to discover answers and take action.
  9. Take SharePoint with you on the go. If you’re running from meetings or out of the office you can share documents, or update your activity feed from your mobile phone or tablet. SharePoint 2013 keeps you connected from virtually anywhere.
  10. Do more with SharePoint apps. The SharePoint store is an online marketplace to discover and install apps that’s designed to work with SharePoint. If you need a specific business solution to help you get even more out of SharePoint the store is just a click away. 
Reference: https://readytogo.microsoft.com

Friday, August 29, 2014

Calculated Fields formulas used in SharePoint

Get Week of the year
=DATE(YEAR([Start Time]),MONTH([Start Time]),DAY([Start Time]))+0.5-WEEKDAY(DATE(YEAR([Start Time]),MONTH([Start Time]),DAY([Start Time])),2)+1

First day of the week for a given date:
=[Start Date]-WEEKDAY([Start Date])+1

Last day of the week for a given date:
=[End Date]+7-WEEKDAY([End Date])

First day of the month for a given date:
=DATEVALUE(“1/”&MONTH([Start Date])&”/”&YEAR([Start Date]))

Last day of the month for a given year (does not handle Feb 29). Result is in date format:
=DATEVALUE (CHOOSE(MONTH([End Date]),31,28,31,30,31,30,31,31,30,31,30,31) &”/” & MONTH([End Date])&”/”&YEAR([End Date]))
Day Name of the week : e.g Monday, Mon
=TEXT(WEEKDAY([Start Date]), “dddd”)
=TEXT(WEEKDAY([Start Date]), “ddd”)


The name of the month for a given date – numbered for sorting – e.g. 01. January:
=CHOOSE(MONTH([Date Created]),”01. January”, “02. February”, “03. March”, “04. April”, “05. May” , “06. June” , “07. July” , “08. August” , “09. September” , “10. October” , “11. November” , “12. December”)

Get Hours difference between two Date-Time :
=IF(NOT(ISBLANK([End Time])),([End Time]-[Start Time])*24,0)

Date Difference in days – Hours – Min format : e.g 4days 5hours 10min :
=YEAR(Today)-YEAR(Created)-IF(OR(MONTH(Today)
DAY(Today)
<=MONTH(Created),DAY(Today)
>=DAY(Created)),12,IF(AND(MONTH(Today)>MONTH(Created),DAY(Today)
“&Today-DATE(YEAR(Today),MONTH(Today)-IF(DAY(Today)

You can get Get more formulas from
http://office.microsoft.com/en-us/sharepointtechnology/HA011609471033.aspx

OR

http://msdn.microsoft.com/en-us/library/bb862071.aspx

Reference Page link:

Tuesday, August 5, 2014

Add a number of months to a date in Excel

Many of my friends have query about how to add / Subtract month in excel, Simple way of doing as below


=Date(Year(Start_Date) + add_year, Month(Start_Date) + add_month, Day(Start_Date) + add_day)

Thursday, July 3, 2014

Calculate Time in Excel

The simple way to calculate the time is sum the two time inputs, shown in below example:

Use Excel built-in function SUM to calculate. Use same as you calculate any number:
Below mention three cells A1, A2 and A3 formatted as time (hh:mm)

A1 = 04:15
A2 = 10:15
A3 has the formula: =SUM(A1:A2)

then A3 will have the correct values of 14:30.

This is only useful until total is below 24 hours, but if your total times are greater than 24 hours then things get different, it will round the calculation and start from beginning and you won't get correct answer.

e.g.: If you have :
A1 = 15:30 and A2 = 10:15 then A3 will have 01:45 instead of 25:45. I.e. any hours beyond 24 hours are dropped.

To retain the hours beyond 24, you have two alternatives:

1. If you want to convert the hours beyond 24 into days then use this cell format : dd:hh:mm. The total in the previous example will be 01:01:45 (1 day , 1 hour and 45 minutes)

2. If you want to keep the hours beyond 24 as is then use this cell format :[h]:mm. The total in the previous example will be 25:45.

In both cases the formula will remain as it is. Only the cell format differs.

Monday, June 16, 2014

How To Get Last Row in Excel VBA code

There are many programmatic way to find last row of data input, but the simplest is....

Dim LastRow 
LastRow = ws.Range("A1").End(xlDown).Row